
 Ivy says:
Awhile back, a commenter requested a granny square tutorial. Right on! I love granny squares. They’re versatile and fast, and you can make one with virtually no thought or counting, so you can watch television while crocheting.
Now, this tutorial assumes you know three basic crochet stitches: double crochet, chain stitch, and slip stitch. If you’re totally new to crochet and want to give granny squares a whirl, I suggest you use the video tutorials found here at Art of Crochet. They’re the best video tutorials I’ve found anywhere- clear and concise, and she holds her hook the same way I do! Woot!
On with the tute:
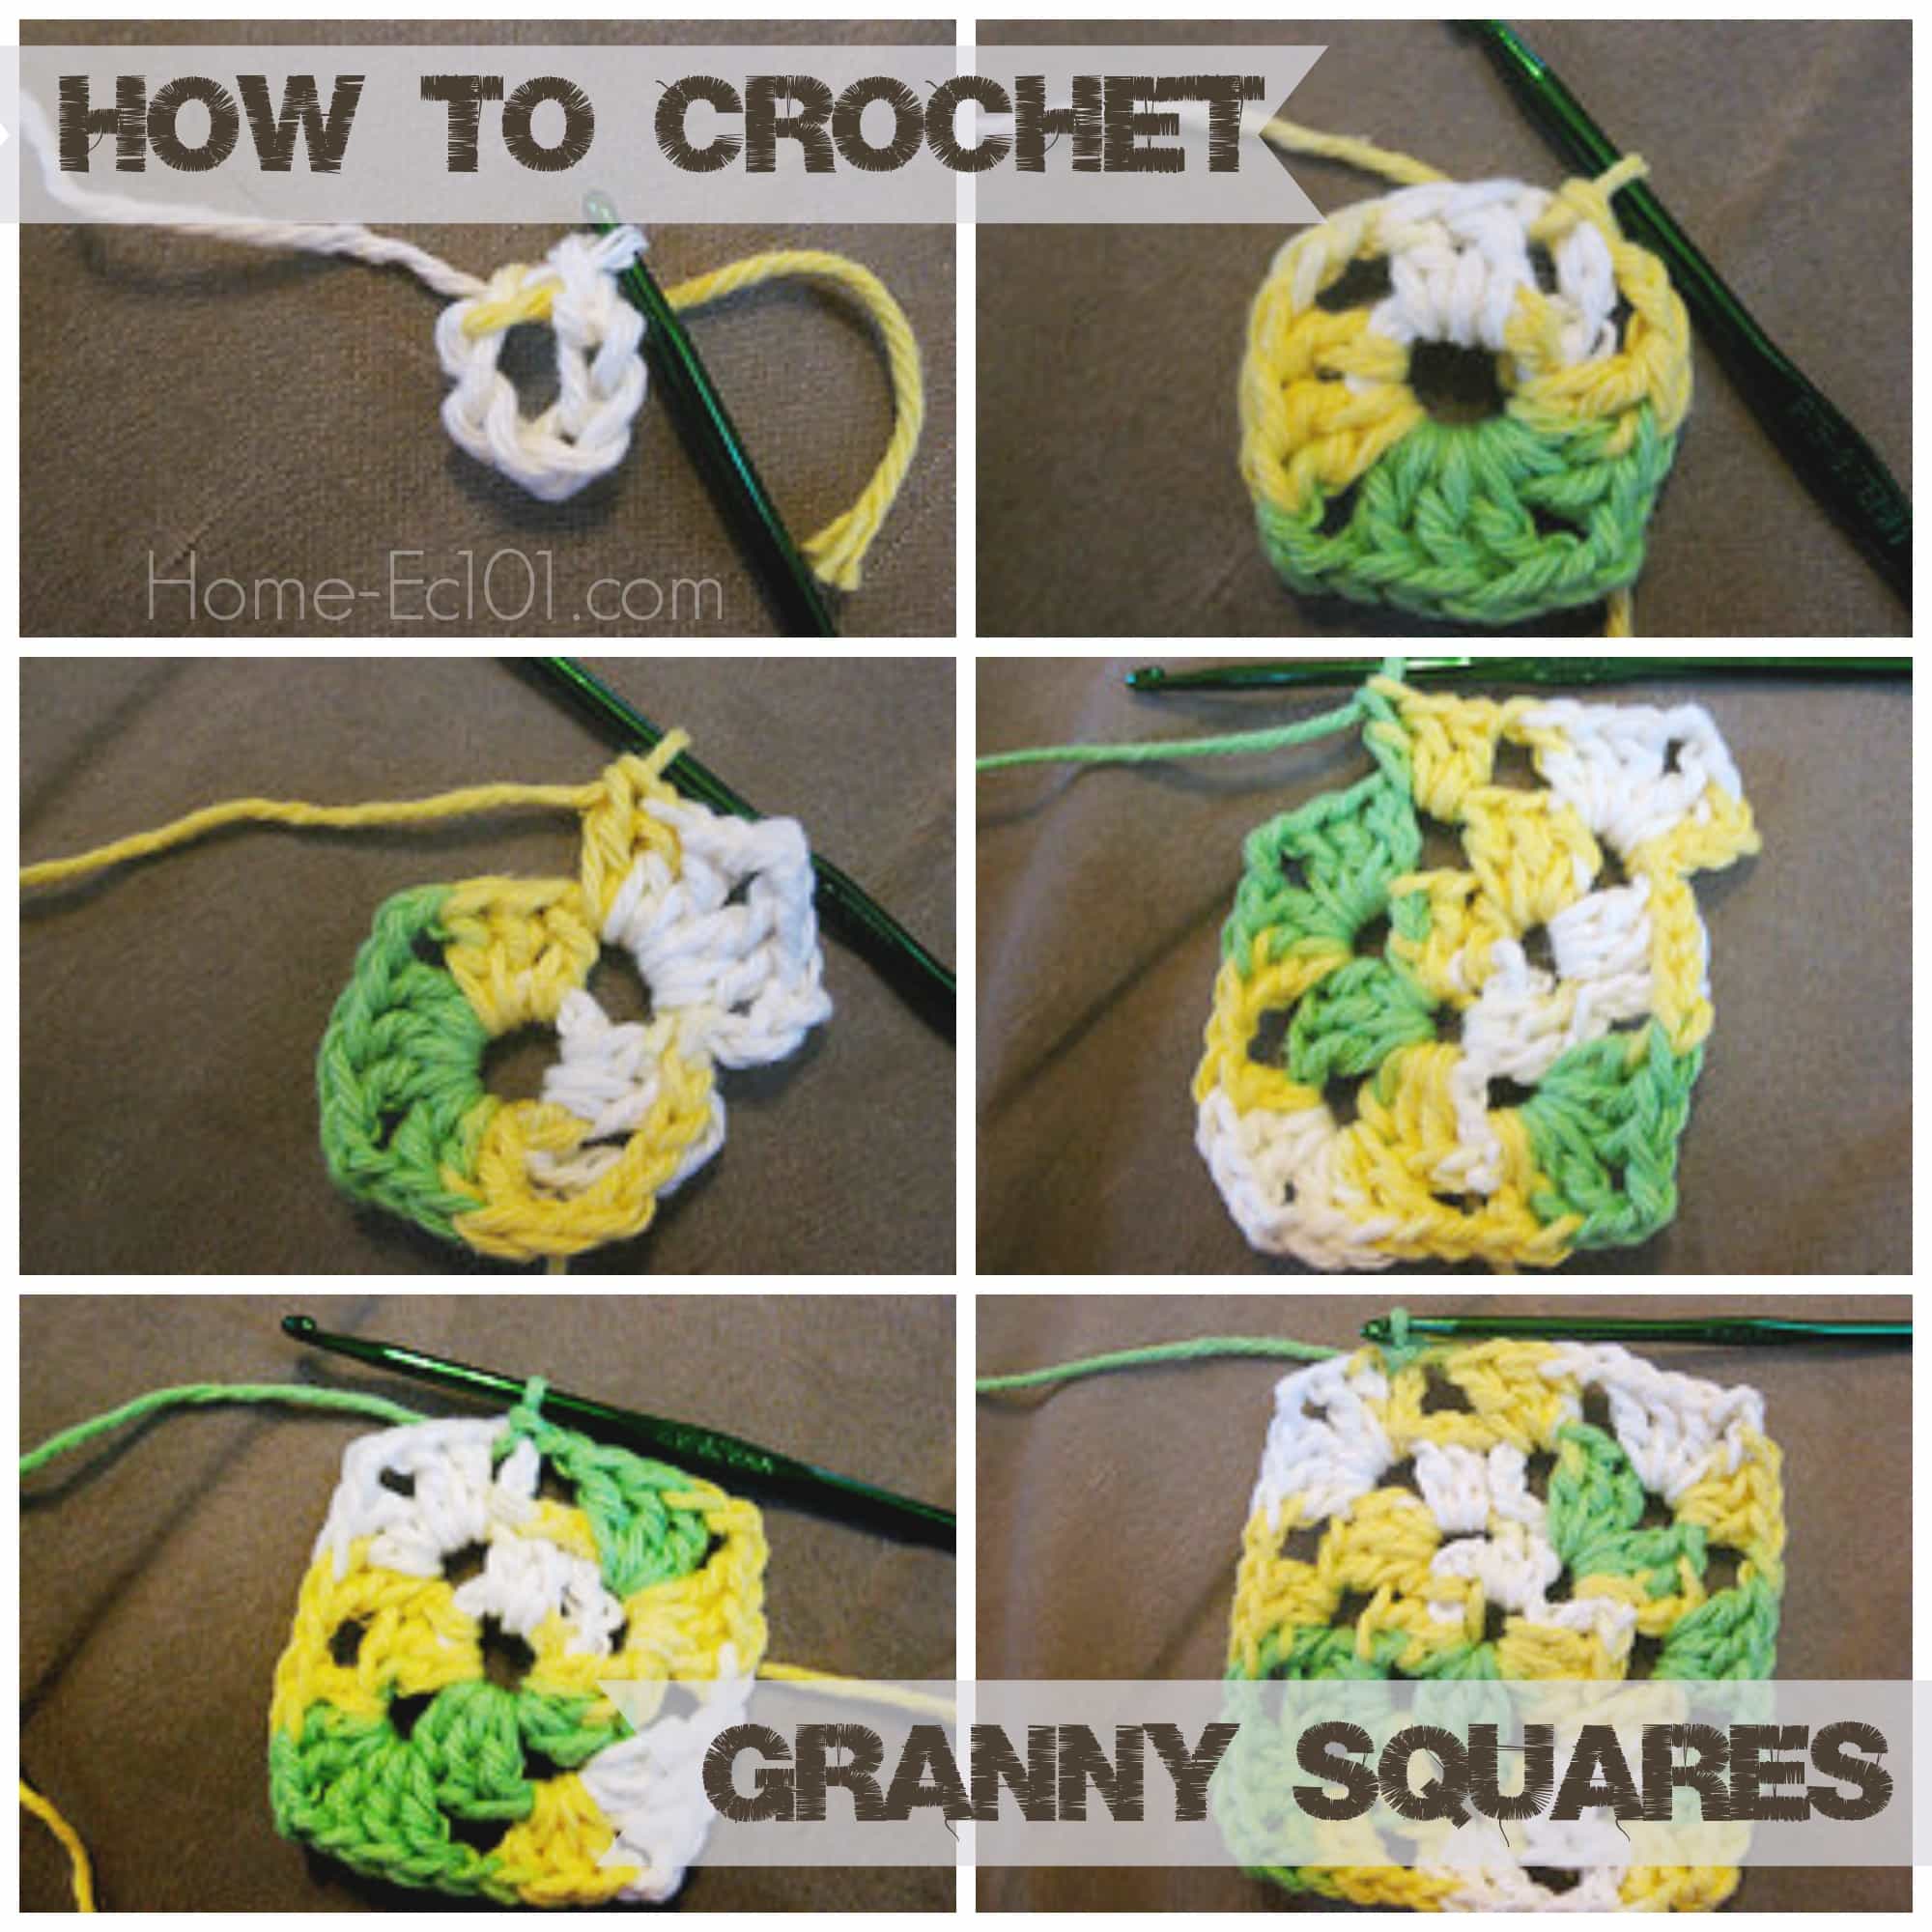
You’re going to want to chain 6, and then join with a slip stitch like this:
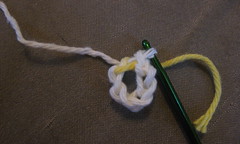
Next, chain 3. This is to get your yarn up to the proper height to make double crochets, and it counts as a double crochet. Then do 2 double crochets, chain 2, 3 double crochets, chain 2, 3 double crochets, chain 2, 3 double crochets, chain 2 and then join this to your first chain. You’re making a little tiny square, and the chain 2s are the corner spaces. Just insert the crochets inside the ring you made- no need to try to fuss with getting them into any kind of individual hole. You may have to push your previous crocheting over as you go. Don’t worry, that’s normal.
When you get finished, it’ll look like this:
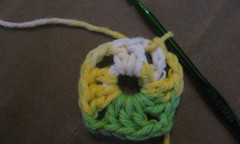
Now, here’s the trickiest part.You’re going to slip stitch along the top of these next couple of crochets until you get to the corner space. It’s not exactly hard to do, but I think it’s a bit tricky because it just seems wrong. It’s not wrong, I promise!
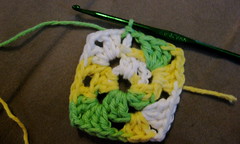
Once you get over to the space, you’ll want to chain 3 to get back up to height, then do 2 double crochets, chain 2, 3 double crochets. All in that little space. The chain 2 part is making a corner for us, again. It’ll look like this:
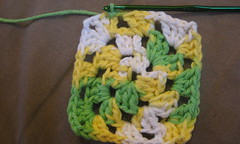
It seems like it’s all stuffed in there, but that’s normal. Chain one to make a space over the 3 double crochets below and then go into the next corner hole and do 3 double crochets, chain 2, 3 double crochets, chain one. Next hole. Keep going until you’ve made it all the way around. Don’t forget to do your last chain one and then join with a slip stitch to the chain 3 you made at the beginning. Now it’ll look like this:
Look, a tiny little square! Now this next round will be how you’ll go until the square is as big as you want it. I’ve made entire afghans by just adding rounds until it was as big as I wanted it. Or, you can make a big collection of squares and sew or crochet them together, or you can make a ton of coasters or hot pads or whatever. But back to the tutorial.
Again, you’re going to ease over to the corner space by slip stitching. This should sound familiar: chain 3, 2 double crochets, chain 2, 3 double crochets, chain 1. Now you’re over in that middle hole you made on the last round. Here, you’ll simply do 3 double crochets in that space, chain 1. Here’s what that will look like:
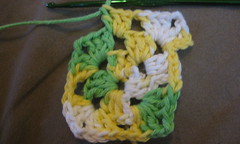
Now you just go back over to the corner and do your corner deal:3 double crochets, chain 2, 3 double crochets, chain 1, move over to the middle hole, 3 double crochets, chain 1, etc, etc, etc. until you get all the way around, don’t forget your last chain 1 and join. It’ll look like this:
You can stop here, or keep going, or whatever.If you keep going, just remember that a total of 6 double crochets and 2 chains go in each corner, and 3 double crochets in each non-corner space, with chain 1s between each of them. Easy peasy. I could teach my dog to make granny squares, if he had opposable thumbs.
Here’s a little note on how I count with these. I think it’s the easiest way- like I said in the beginning of this post, almost no thought is required. This is what runs in my head while I’m doing this: 1, 2, 3 (the chains) 2, 2, 3 (it’s 3 steps to make a double crochet), 3, 2, 3, chain, chain. 1, 2, 3. 2, 2, 3. 3, 2, 3. chain. Hopefully that makes sense, but that little internal dialogue eliminates the conscious thought, so I can do something else like watch TV or talk to other people. People are always amazed when you can crochet and carry on a normal conversation, so get your granny square skills going on and you can impress people left and right.
Tell me, home eccers- what will you make with your granny squares? And let me know if you have any questions, I hope this is really clear and easy to follow, but what makes perfect sense to me, may have you lost in the woods.

OMG: I have found it. The end of the Internet! 😉
Love it! This comes at a perfect time as I have been attempting to teach my middle daughter how to crochet, and neither of us have patience! LOL I haven’t done granny squares in years, thank you for the reminder! ..am foraging for my needle right now….
Reminds me of Mom crocheting while watching the tube
I have never learned to crochet, but I want to. Before I check out the tutorial you linked for uber-beginners, would you tell me what to buy?
All you’ll need is a hook and some yarn. What kind of hook and what kind of yarn depends on you, but I have some preference when teaching beginners. I like a G hook when first starting out. Since you don’t want to overbuy yarn when you might hate crocheting after all, I suggest getting a brand of yarn that’s not too expensive and has no dye lot, so if you love it, you can continue.
My very favorite brand of yarn that fits these is Caron Simply Soft. They’re not joking about the soft- I think it’s one of the softest all-acrylics out there. And it’s a worsted weight, which will work perfectly with your G hook.
There are lots of other crochet accessories out there, but hold off on buying them until you’re sure you dig crocheting. If you don’t want your yarn rolling all over the floor (I personally kinda dig watching my cats give chase, but I’m weird like that) use an old tote bag to put your yarn in.
I have got to learn how to do this. I can knit up a storm, but for some reason crochet scares me.
Granny squares seem like an easy way to use up bits and bobs of extra yarn and make something nice out of it.
I wish i had found this months ago! I was looking all over for something like this and then finally i got fed up and made up my own way. Its not too far off, but whenever anyone watches me who knows what they’re doing they go nuts.
This is great, fortunately i was taught how to make the squares as a little girl by my great aunt.
I’ve been spending heaps of time Granny squaring lately & this is the absolute best pattern. Great tute – congratulations!
thought i’d let you guys know i just stumbleupon’d this. you’re out there!
Love your site. Such detail to the information.
Adding your personal comments makes you more real and not just words on a page.
I am a long time crocheter and did pick up a few new hints and ideas to improve my skills.
Thanks
Barb
I am so happy I came across this tutorial! I am very new to crochet and this pattern is allowing me to make a very nice afghan for my sister! Thank you so much… hope to see more like it in the future 🙂
This tutorial is good, but it doesn’t really make sense to me.I’m glad you did it because it really gave me a start, but next time just be more clearier on the 1st/2nd step!!!
Thanks so much,
Makenzie
I wasn’t able to follow the instructions, but I just started learning. I can’t wait to be able to do this!
I do my corners slightly different. I chain 3 in the corner and then double crochet two and then continue to the left – that is I only make half the corner – I work all the way around and finish in the same hole with 3 double crochets and chain one then single crochet into the top of the initial chain 3 – does that make sense?
It ends up looking pretty much the same as yours, but I start with only half the corner and end with the other half.
I am new to crocheting granny squares and have caught on good but having problems making the back side look as good as the front how do I make the back side look good. I do weave in the ends but still not good enough. I am using two different colors. I really like your web site. Thanks for taking the time to teach me. Geri
I just took up crocheting at the beginning of this week and started out with a pretty simple scarf but I’m really dying to make a granny square blanket. Your tutorial made it really easy for me to quickly scope out the basics of the granny square and now that I have that down pat, I’m really excited to head to my local yarn store and pick up what I need to make a full size blanket. Thank you!
I’ve made the granny sauares. But how do you join them together?
Thank you SO much. This is the first tutorial that really made sense to me, and I’m already on the fifth row of my granny square!
I do love granny squares! It’s such a long time since I made any (grabs wool)
Thanks much! This is what I was looking for to make my great niece's blanket. Thumbs up to you for letting folks download the pattern.
Thank you so much for this tutorial. I've looked at tons of others + videos on YouTube and nothing has been working for me! This is the only one that helped me end up with a somewhat decent granny square. Thanks 🙂 xoxo
I am trying to make squares with my left over yarn and link them all together to make a crochet bean bag.
My recent post Swirl Cap
This is the first tutorial that actually made sense. Thank you so much!
I just wanted to say thank you for this tutorial!!! I have been watching youtube videos and reading other blogs about learning to create the granny square. This is the first time that I have actually "got it." Lol! I accidentally found your blog, but I'll be back!
My recent post Autism Articles- Edition 1
Bless your heart! I’ve been trying to remember how to do a Granny Square – wanted to make a rug using this design and just couldn’t get it~~I’ve been making rag rugs using sheets that have been ripped into one inch wide strips and they are all oval and I need a square!! thank you sooooooo much!
Sue H. in North Carolina
Thankyou!! I’ve trawled through lots of different tutorials but this is by far the easiest to follow… I have just completed my first ever granny square 🙂 Happy 🙂
Thank you so much for the very clear granny square tutorial. I’ve looked at lots of others but was getting extremely frustrated until I saw yours. I’ve only just taken up crochet seriously and wanted to make a cushion cover. Can’t wait to get started now! (Isn’t the Internet wonderful ?!)
Thank you very much I’m new to crochet
And your tutorial was so easy to follow that
I’ve just made my first granny square
I’ve been crocheting for a long time but I taught myself by looking at stitches in books. I have NEVER been able to make a granny square until now! I guess the stitches just kept getting all jumbled up and I wasn’t ever quite sure where they were all suppose to go. THANK YOU so much for these clear and easy directions!! Very much appreciated for I can finally make a granny square!
Thank you. I watched sooooo many videos on youtube. I looked at soooooo many different step by step instructions and all I found there was confusion. Thank you for the most easiest step by step on the internet.
I have finally managed to crochet a granny square after finding this page!! I had looked at several books and videos online and finally knew what to do when I followed this pattern! Big thank you!
This helped me so much! I just learned 5 days ago, and almost have my nieces baby blanket done!!!(: thank you! Now i just need to figure out how to put them all togrther(: