
 Ivy says:
You must congratulate us, this is our thousandth post here on Home Ec 101! So, y’all will get something special, a fab tutorial! Sorry it’s late, I was showing my mom how to “delete all” on my camera (she and I both have the same model) and I deleted everything instead of cancelling the delete. Whoops. Well, these pictures are better than the first ones I did anyway.
So, anyone that has ever bought a Knifty Knitter long loom set knows the instructions appear to have been written by a drunk sock monkey. They just don’t make that much sense. When I went online looking for help with it, I found one tutorial and a few youtube videos, but I had to go looking for all I needed. I figured I’d do a tutorial here so both starting and casting off can be found all in one place.
To see the full tutorial, just click the jump.
The long looms can actually handle everything a circular loom can, but what makes the long looms different is the fact that you can make a flat, double knitted panel. This is what this tutorial shows- the flat, double knit method. You’ll want to either use a really chunky yarn, or if you want to use a worsted weight, use 2 strands of yarn. I used the chunky yarn, so if you go the double strand method, keep in mind you’ll be doing everything with 2 strands of yarn at once.
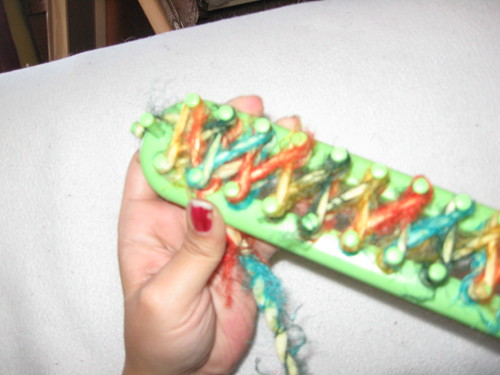
First, wrap the yarn around the end peg like this:
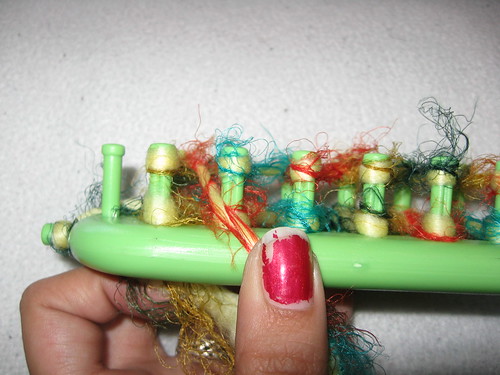
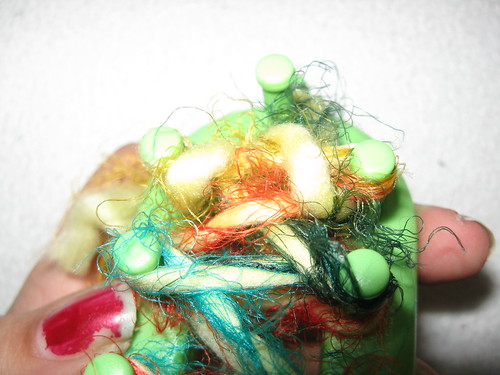
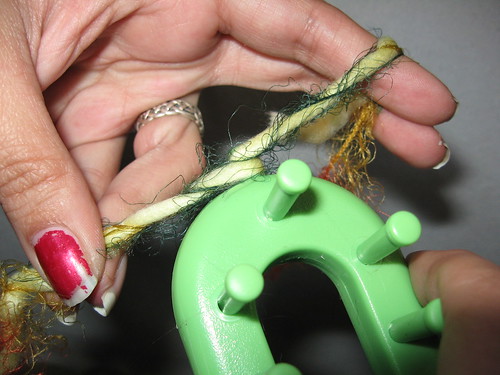 Please forgive my one painted nail, I was trying my daughter’s nail polish pen out, and decided I hated it. I’ve also run out of nail polish remover, so I have one funky nail right now.
Now, you can use a slipknot to hold the yarn onto the end peg, but if you do, you’ll have to remember to remove it as your knitting gets longer. I prefer just to wrap it around and hold it while I do the first few stitches. Bring the yarn around and put it between the first and second pegs on the top row. Then wrap it around the first peg on the top row and put it between the first and second pegs on the bottom row, like this:
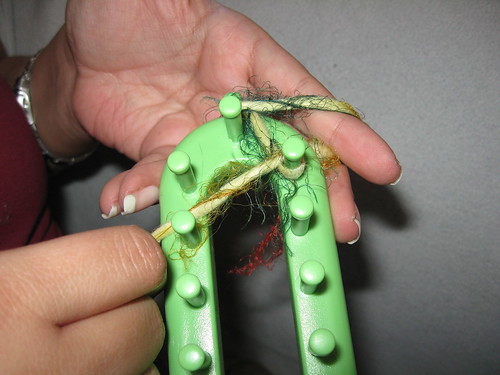
Then wrap it around the first peg on the bottom row and bring it between the second and third pegs on the top row, like this:
Then wrap all the remaining pegs in the same manner. Here’s a little video:
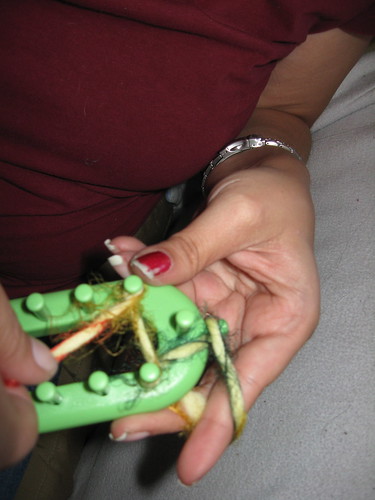
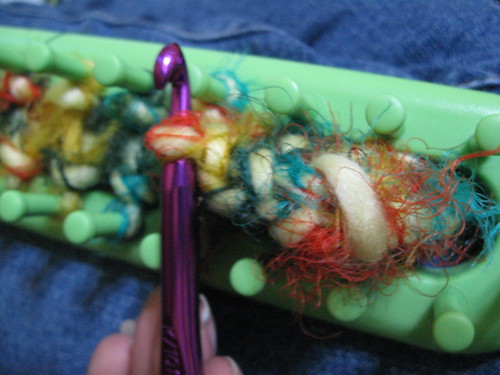
Hopefully that’s clear enough. I also did the end peg- when you get to the end, just wrap it around making a “u” shape. Here’s a picture with some nifty arrows showing you the right direction:

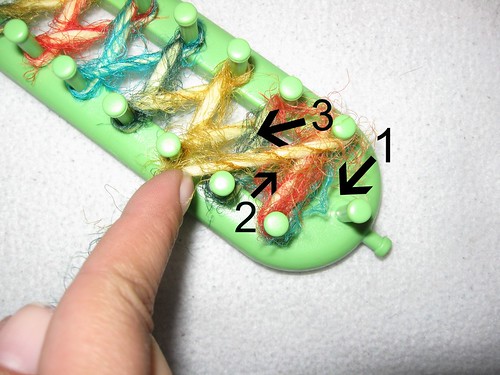
Then, push all the loops to the bottom and then just go back the same way you came. I’ve marked this photo to make it clearer:
Then once you have it all double wrapped, do the same thing you did with the end peg on this end. All pegs should be double wrapped except for the very last peg on the opposite side of where you started. Here’s what it’ll look like when you have it all double wrapped, from the top view:
And side view:
Then, you’ll take your hook that came with your looms and, starting with the “u” shaped loop you wrapped last, pull the bottom loop over the top loop, and push it off into the middle of the loom. Like so:
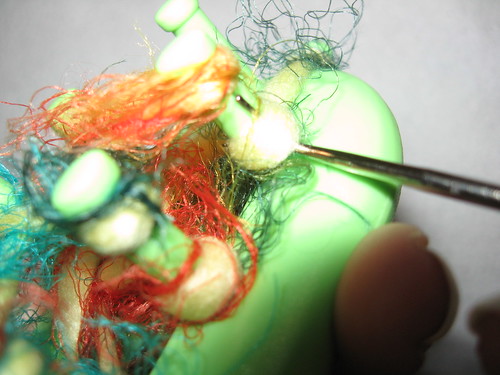 Hook the bottom loop,
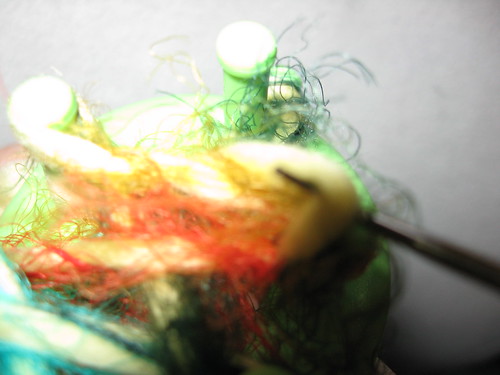 Pull it over the top.
 It’ll be loose, don’t worry. This is what it’ll look like when you have the first two loops pulled over.
In case that wasn’t clear enough, here’s a little video:
So, just do that, following the way the yarn goes, all the way to the end, then wrap again. Then do the loops again. Etc, etc, until you have the knitting the length you want. Then, it’s time to bind off. This time, I did a video first, because it’s really much easier to just watch how it’s done.
See what I did there? Hook the first loop, then grab the second loop, and put the first over the second. go all the way down in the same order your yarn goes in, pulling the old over the new. This is easiest with a crochet hook, although you could use the hook that came with your loom. If you start pulling off loops on the opposite end of where your yarn is at, then just stop and pull the end of your yarn through the loop, tighten and weave your ends in. (Which, I don’t have a picture of, since this was all just an example. I’m making a skinny scarf with that yarn, actually.) But here’s the top view of what your binding off should look like in-progress:
And it’s just that easy. I normally despise knitting. it seems to go so slowly and it’s boring. With the loom, I think it goes a whole lot faster and you can do it while watching television, since no counting is required. Finally, a way for me to knit things without ending up in the nuthouse!
Enjoy your knitting, Home Eccers!

Congratulations on the 1000th post….can’t wait to see the next 1000!
Great tutorial….
oooh… thatt looks like fun. “drunk sock monkey” sorry, I don’t know why, but I got a huge kick out of that.
Oh wow. Reminds me of the weaving loom I had as a kid – I must have made dozens of pot holders, plus placemats and a few rugs by stitching together the squares. I’m not sure about the knitting loom shown above, but the one I had would also take 1/2″ bias-cut material strips, knotted tightly end-to-end in place of yarn. This was interesting to work with, a great way to use up “free” fabric scraps, and better for heavy-duty things like pot holders and rugs.
I now have two knitting machines similar to this one:
http://www.bond-america.com/products/usm.html
One is a heavy duty antique (bakelite body and aluminum needle guide!) I got at a flea market and the other is one I bought at McFrugal’s (proto Big Lots) and then found accessories for it online.
If you get extension kits, you can make almost anything, and they knit very quickly. I’ve made a ton of knitted blankets for baby showers – those take about two evenings, including time to crochet the edges by hand and add a couple of crocheted embellishments. I don’t have time for anything more complicated. :o( You will need a good craft table to set up your knitting machine; it’s not something you want to clear off the dining table in mid-project (although this is possible, it requires time, patience, and a long metal rod with end caps to hold your stitches that you’ll have to make yourself).
The only “trick” to this kind of machine knitting is not to go too fast or to force the machine. Buying the row-counting accessory is strongly advised! Post-it sticky arrows are good for marking the stitch where you make a transition in your pattern, such as weaving in another color or a specialty yarn.
Oh when i finally found this i was so relieved, i totally agree with the directions comment..lol.. Im a recent stay at home mom and decided to find something to pass my time and try something that i have never done before, i heard about this and went out and purchased it,brought it home and opened it and immediatley wanted to change my mind. i have never knitted before EVER,so this all was very new, (and with those directions i knew i couldn’t get through it.) So anyway THANK GOD FOR YOUR TUTORIALS!!!! i look foward on learning more.
Thank You,
Nat
I never heard of a knifty knitter, but I had to say that the drunk sock monkey had me literally laughing out loud.
Then I had to explain myself to those around.
Gee, thanks, Ivy.
LOL
This helped me so much!!! I have a rectangle loom with out the extra peg on the end. I think it is different than the long loom, but it has the same idea. I like how you showed easy step my step instrucions and I am now working on making an afgan. Oh by the way I’m twelve and I had finished a scarf on the round loom and wanted to try this one. So thanks!
I love LOVE love the yarn!
THANK YOU THANK YOU THANK YOU! I travel for work frequently and wanted a new craft that I could take with me so I decided on the Kniffty Knitter…I like to think I'm pretty crafty and creative but after reading the aptly correctly described drunk sock monkey instructions I had second thoughts but, then found this! Thanks for all the info provo craft should hire you for their instructions!
Hey, this is super helpful! Thanks!
wondering if you know of a tutorial on how to cast off a long loom when using the end pegs
Hi Ivy! I'd like to know if you have a tutorial on how to do the single stitch on the long loom…Thank-you!! Loved the "drunk sock monkey" comment – so true!!!!!
This was such a HUGE help to me. Actually a video and pics of what I am supposed to be doing. Any chance you have done a baby blanket on a long loom and can do a tutorial of that too??? 🙂
Hey Ivy, the drunk sock monkey is on the loose again….can you do a tutorial on mattress seams? Banging out a long narrow piece on the long loom is great but it makes for a tiny blanket. Thanks!
I still didnt get it ???
hahaha we have the same name. Its spelt the same too.
Hi when out of nail polish use mineral spirits or put clear nail polish on let sit for fifteen seconds and wipe off.repeat…You do have beautiful nails by the way….Ok now my question…That’s the designer in me….I am using the longest loom to make a single stitch panel for a king blanket.I just started the first row using just one side.I got to the end and don’t know how to turn to do my second set of emerald.do I just wrap the last peg twice and come back? Thank you……The drunk sock monkeys confused cousin in NY
I meant to say second set of e wraps. Thank you….gr8 directions!
I’m trying to learn how to knit on my loom, but I’m having a hard time seeing it because of the crazy yarn you used. How about doing a video with plain yarn.
How do you finish off the front end of the scarf? I can bind off the end piece of it, but the front end stays too loopy and somewhat free-form. I found instructions somewhere on how to bind it somewhat like the end binding off, but lost it long ago and have not been able to even find what term defines what I need to do. Any assistance?
DMM
I had a kitting Jenny when I was a kid it was like a long loom but it had short leg I made a lot of long scarfs my daugther got me a long loom for Xmas do you have any ideal how to make a shawl with a long loom a have 4 size of long loom 21 in 17 in 13 in 8.75 in please help