
 Ivy says:
Long has the debate raged about whether ninjas or pirates are cooler. I like them both, but sewing a ninja plushie is a whole lot easier than sewing a pirate plushie. Check this coolness out:
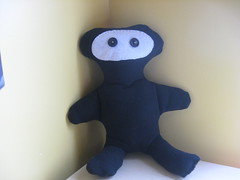 Awesome, eh? This project is good for the beginner sewer, and could even be a good first project.
Time to make project:
As an intermediate sewer, this took me about 2 hours to make, not counting fabric shopping and general messing around.
Skills Emphasized:
These are skills you will use when making this project. It will help you learn:
- Hand sewing
- Button sewing
- Machine sewing
- Sewing curves
- Sewing straight lines
- Extremely simple pattern making
- Stuffing a plush toy
Materials Needed:
This project is rated inexpensive. My cost of materials, gotten on sale, was $4. Material costs should not exceed $10, provided you have the common sewing supplies like a sewing machine and needles, etc.
- 1/2 yard of fleece fabric
- 1 piece of white felt
- 2 buttons
- Poly Fill stuffing
- Thread, in black and white
- Large piece of paper to make pattern (Newspaper end rolls are great for this)
- Needle for hand sewing, medium sized
- Scissors, or rotary cutter and rotary cutting mat
- Sewing machine
Click the jump for the full tutorial:
First, you’ll need to make a pattern. You’ll want a large piece of paper to start with that is cut to about the same size as your fabric is when it’s folded in half. I like to use newspaper end rolls, but any large piece of paper or even tissue paper will do. I struggled with getting proportions right, until I had an epiphany: Fold the paper in half, lengthwise and draw half of your ninja, then cut it out. This assures that the proportions are the same on both sides, the part I was struggling with. I wanted mine to have a sort of ET head, so I lengthened the head more than I normally would for a rounder head.
Make sure you have enough space for your seam allowance. If you are a beginner, make sure your curves are nice and gentle, because sewing curves is a little tricky at first. Here’s the pattern I came up with:
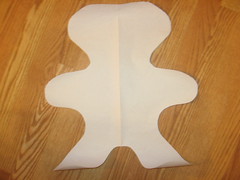 The edges are a bit curly, the only complaint I have with newspaper end rolls.
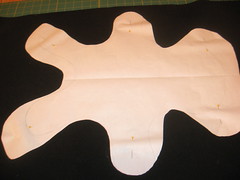
Then lay your fabric out on your cutting area, and pin the pattern onto your material that is folded in half. Don’t put any part of your pattern on the fold.
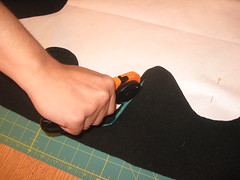
Then, cut along the edges of the pattern. This is where I once again evangelize about rotary cutters: they’re expensive, but so worth it. Well, the rotary cutter itself is not so expensive, but the mats you have to use with them are terribly expensive. Even so, it’s completely worth it, especially when you’re cutting around curves like this. If you’re the type of person who does one or two projects a year, then no, it might not be worth it to you, but if you’re like me and like to sew a lot, get a rotary cutter. You’ll lurve it.
 If I ever decide to quit the high paying world of professional blogging, I am so going to become a hand model. Don’t I have a fabulous hand? 😀
Next, work on the face. You can make another pattern, or you can be risky like me and just cut out an oval. It’s up to you. I use felt for the face. There are both upsides and downsides to using felt. The upside is, felt is ridiculously cheap. I paid 15 cents for a rectangle of felt that was perfectly sized for this. The downside is, felt is not terribly washable, so if you need to wash your doll, my suggestion is to buy a white remnant of fleece. Since this ninja is for my brother (shhh! don’t tell him!), washability’s not really a problem, so I went with the cheaper option.
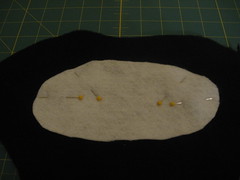
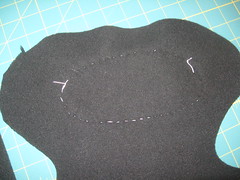
Pin the face on, then you can either hand sew or machine sew the face on. I prefer hand sewing for a couple of reasons. First, hand sewing is a lot easier to keep neat and even. Secondly, I don’t have a ton of bobbins, so by the time I emptied one bobbin and put white on the bobbin and then sat down to sew, I could have it hand sewed in a jiffy.
My method of hand sewing is this: thread your needle and pull out an arm’s length of thread. Snip the thread and then pull the two ends of the thread even. Then tie a knot in the end of the two threads. This way you have 2 layers of thread and it’ll hold stronger. Put your thread in from the back of the project so your knot doesn’t show on the right side of the fabric. Then, just weave in and out, taking care to keep your stitches neat and even. They don’t have to be perfect, but keep them about the same width on both sides, and it’ll look nicer.
This is what it’ll look like from the back:
Then, whip out your button box. What, you don’t have a button box? That’s okay, neither did I until my grandmother passed away and I inherited hers. If you don’t have a button box, you can always just cut out circles of the leftover fleece using a compass and chalk and hand sew them on.
If you do have a button box, get it out and start finding matching buttons for eyes. I tried several and came up with this:
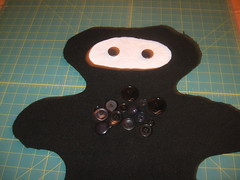
Then, place your eyes where you want them. You can use pins to hold them in and keep them where you want them, or you can use a bit of chalk or pencil to make marks where you want them. I used pins because I was too lazy to go find my dressmaker’s chalk:

Then, just sew on your buttons. Sewing buttons on is as easy as pie- just thread your needle the same way I said to above, make sure your buttons are in the right place, and whip your thread through the holes until the button feels secure when you yank on it. Then tie a knot in the back to secure your thread.
Having trouble finding the holes? No problem, stick a pin through the hole you’re trying to locate, and stick your needle in right next to it.
Once you have the face dealt with, put the pieces back together with the face side down, and pin the fabric together, taking care to match the edges up as perfectly as possible.
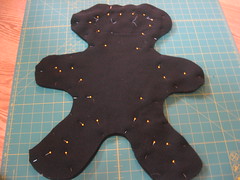
Now comes my favorite part: sewing. If you have an old, cranky machine and it doesn’t want to sew well because the fleece is so thick, here’s a trick I learned recently. If your machine has the ability to drop the feed dogs, drop them. If not, tape business cards to either side of the feed dogs to hold them down. Or, if you have an adjustable pressure foot, adjust it so it’s higher. Neat trick, eh? Anyway, sew:
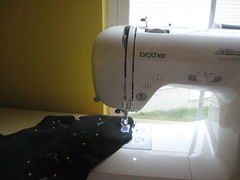
I like to leave about a half inch seam allowance to make sure it’s completely sewn all the way around. I’ve learned the hard way that if you leave too small of a seam allowance, it’s easy to end up with little holes in the sides. Learn from my mistakes: Make sure you have a big enough seam allowance.
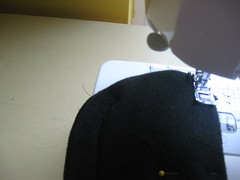
Make sure you leave a space for turning it inside out and stuffing. I like to leave a space at the end of one of the arms or legs:
Once you have it completely sewn except for the space in the leg, check on both sides to make sure your stitching is all correct and you didn’t leave any holes or anything. Then, turn it inside out:
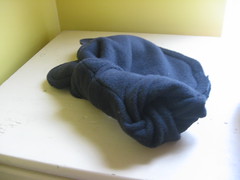
You can use a chopstick or a pen or whatever to push everything so it’s completely pushed out. Now, you have a flat body that looks like this:
Time to stuff. What do you mean I didn’t buy stuffing? Drive to the fabric store, cursing your stupidity. I like to stuff mine fairly loosely so it’s soft and cuddly. I also generally leave slightly less stuffing in the joints- neck, arms, legs- so it sits down a bit better. But it’s up to you. You can stuff it very firmly if you wish.
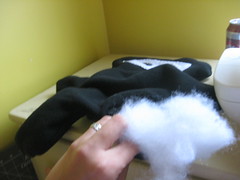 There’s that amazing hand again. Whoo, sexy.
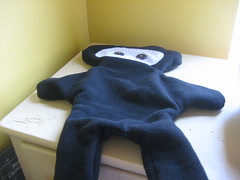
Once it’s all stuffed, time to hand sew again. I whipstitch around the edge, and voila! You have a ninja.
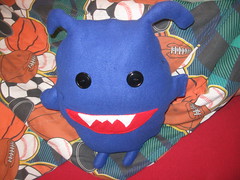
Using the same techniques, you can create all sorts of plushies- here’s a monster I made:
Happy sewing!

Clean socks work well for stuffed creatures too… I was making sock monkeys for gifts and my son wanted a sock monster… it turned out very cute. I will have to try the creatures in fleece, they look like cuddley ninjas, hehe
I made one and it came out really cute. I had a little trouble with sewing the face because my fabric was stretchier than it should be ideally, but the fabric was so soft and cuddly my grandson loves it.