
 Heather says:
At long last, the first in the series of simple bread tutorials. We are beginning with a plain white bread recipe. This version is extremely simple. It is free of most allergens (wheat being the obvious exception) so it is useful for those avoiding eggs and dairy. Nutritionally, well, let’s just say that you won’t be making great strides over store-bought, but at least there is no high fructose corn syrup. Warm up the oven, roll up your sleeves, and let’s get started.

Simple White Bread
Ingredients
| 2 cups warm water ~110°F |
| 1 1/2 TBSP Active Dry Yeast |
| 1/4 cup sugar |
| 1 1/2 tsp salt |
| 1/4 cup vegetable oil + extra for bread pan & bowl (vegetable or olive |
| 6 cups bread flour (may be slightly less in dry climates) |
Directions after the jump.
 Dissolve the 1/4 cup sugar in 2 cups warm water in a large mixing bowl. Don’t forget, hot water will kill yeast.
 Add the yeast to the sugar water and wait a few moments until it begins to look creamy.
Stir in the oil, salt, and four – five cups of flour. The dough will be quite heavy and difficult to stir by hand.
 Spread the remaining flour on your work area and place the dough on the well floured surface. Go ahead and wash and oil your bowl now. Flour your hands well.
 To knead the dough place the heel of your dominant hand into the center of the dough and push away from your body and toward your work surface. Grab the edge of the dough fold it back on itself and give it a quarter turn. Don’t be gentle, this is a great way to work out some aggression. Feel free to slam the dough down on the counter.
Squish, fold, turn, slam, repeat. I knead my bread between five and ten minutes, this mostly depends on how energetic or annoyed I am at the time of kneading. When kneading by hand, under kneading is far more common than over kneading. To check, press your clean (unfloured) palm on the dough for about ten seconds. It shouldn’t stick (wheat breads are tackier than white).
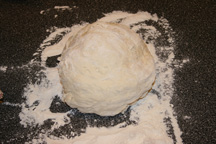
 Roll your dough into a ball and place into your oiled mixing bowl. Turn the ball several times to coat. Cover with a damp cloth and place in a warm, non-drafty place to rise. Allow to rise for about 1 hour or until doubled in size.
 My favorite part is punching the dough down. It’s fun, but don’t get carried away or you’ll break down all the air pockets and create a dense loaf.
 Divide the dough in half and press into two rectangles about 12″ x 6″. Do not break out the ruler, it doesn’t have to be perfect.
 Shape the dough by rolling it into a log.
 Tuck the ends under and place in an oiled 9 x 5 bread pan.
 Allow to rise until slightly above the rim of the pan. (I accidentally let this loaf go a little too long). While the dough is rising, preheat the oven to 350F.
Bake for approximately 30 minutes. To check your bread, firmly tap the top of the loaf, when done it will have a hollow sound. Place on a wire rack to cool for 5 minutes and then remove from the pan and allow to cool completely on the rack.
While warm bread fresh from the oven is fantastic, it will not slice well until it has cooled completely.
Enjoy!

I really like making simple breads like this to go with homemade soup. In fact, that’s actually our traditional Christmas Eve dinner at our house.
We use a bread machine, but not to do the baking, just to mix and knead, using the dough cycle. Lets you make the more traditionally shaped loaves or rolls instead of that strange bread machine shape.
It’s worth noting that, while it’s unlikely to last long (warm homemade bread tends to disappear around here), if you *do* have leftovers, they are missing the preservatives found in store-bought bread as well as things like corn syrup. That means that mold will show up far sooner than you may be used to if you’ve only ever had store-bought.
I am making this tomorrow morning…..and plan to serve my family fresh bread with strawberry jam (homemade last fall) for brunch!!
I can’t wait…..
When I’m in need of more time (almost always) we use our bread machine to do the mixing, kneading too. Then shape the loaves and bake in the oven. I like the results better than when baked in the machine,
When I do have time to indulge, I LOVE to make bread, kneading with my hands. There’s something very zen and satisfying about kneading dough and seeing the dough change textures in the process.
Either way, the house smells fabulous and the omemeade bread is sooooo good!
Thanks for the great post and pics!
I made the bread (two loaves)….and my husband and kiddos LOVED it. I think I may have started a new Sunday Brunch tradition.
Thank you for posting this no-nonsense recipe!!!!
I made the bread and it failed…it didn’t rise very well. Maybe I beat it up too much.
Tomorrow its my wife’s turn. She said she will show me how it’s done.
There are a lot of things that can cause bread not to rise- the yeast could be too old, the temp of the place you’re rising the bread could be not warm enough, or you could be over-kneading or under-kneading the bread. Good luck with your next batch, I know it can be tough to get exactly right!
Here are a couple of links that should help:
/bread-making-meet-the-yeast/
/bread-making-rising-to-the-occasion/
mmm… I love home-made bread, though I rarely do it nowadays as I work for a craft bakery, and get a generous staff discount!
Nutritionally-speaking, your recipe is probably a bigger step-up than you think, Heather – mass-produced bread can be pretty dire: Andrew Whitley, a British baker & writer has some very interesting things to say on the matter (see http://www.breadmatters.com/advocacy).
Happy baking, all!
Melanie
I love to bake bread, and am just waiting to get caught up on work so I can try this recipe.
However, I do have a bit of a problem. My husband doesn’t like this kind of bread for sandwiches. He says it’s too dense or something like that. I would love to stop buying bread in the store, but what can I do?