
 Ivy says:
Technically, this isn’t a quilt, since it’s not quilted. You can quilt it, if you want, but that takes the easy factor down a notch and takes the fast factor down a few notches. As an intermediate sewer, this took me about 4 hours to make.
Here’s what you’ll need:

![]()
5 total yards of flannel material
Scissors or a rotary cutter and rotary cutter mat
Ruler or yardstick OR 8.5 inch quilting square
Thread to match or complement the fabric
Sewing machine (preferably with walking foot)
Spring action scissors
Seam ripper
Pins (optional, if you’re risky like me)
Click through the jump to get started.
Let’s talk about the flannel material. You’ll need five total yards of the material to make a blanket that’s 41 inches by47 inches, about the size of most throws. This uses 80 total squares. You can get 16 total squares with a decentish amount of scrap material per yard. It helps, when buying fabric for this project to keep this in mind. My quilt ended up with 5 and a quarter yards of material, since I bought an end bit, so mine actually has 84 total squares. I think a 5 square by 8 square quilt is a bit easier to plan than a 6 square by 7 square quilt, so it’s up to you what you want to do.
After you’ve gotten your material, cut out the squares. The easiest way to do this is with a rotary cutter and a rotary cutter mat, using an 8.5 inch quilting square. That’s a tad on the expensive side, though. You can cut out an 8.5 inch square of cardboard that does a fine job and use scissors if you need to do this on the cheap. I’m doing a lot of rag quilts for Christmas, so I went with the more expensive, but faster method myself.
Once you have all your squares cut out, lay them out on the floor in the way you want your quilt to look. Mine looked like this:
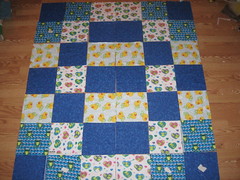 This might have been the longest part of the process, deciding how I wanted the squares to look.This is for a friend who graduates from college tomorrow- see the 8 in the middle? Nifty, if I do say so myself.
So, once you have all the squares laid out, pick them up and carefully stack them in order. The way I do it is to go from bottom to top, right to left, numbering each one so I have a nice neat stack of squares in th correct order like this:
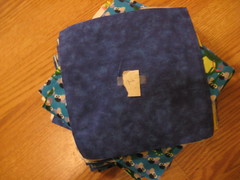 The squares are stacked on a diagonal like that to make them easy to pick up the 2 you need when sewing. I’m all about saving time, yo.
This is the point in time where you’d make a “quilt sandwich” with 7 inch square batting pieces and sew an X in the middle of each square to quilt it, if you were quilting it. And if you want to make a nice thick quilt, go right ahead. But the method I use is time saving and makes a blanket that is plenty warm in the winter, but nice in the summer as well.
Okay, now for the fun part: time to sew.
 First, sew columns with the squares, using a half inch seam.
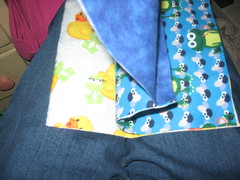 Go ahead and let that seam hang out. Make sure, however, that all the seams are hanging out on the same side. I sewed more than a few seams backward and had to get out the handy seam ripper and do it all again.
 Once you have all the squares sewn into columns, pin the first column to the second, sew this with a half inch seam. Then pin the second to the third and so forth. Again, make sure the seams are all hanging out on the same side.
Then sew all around the perimeter of the blanket using the handy half inch seam.
Once you have all that finished, it’ll sort of look like a blanket, but with all these seams hanging out. It’s funny, I took my blanket over to my mom’s to work on cutting the seams to rag the quilt, and my mom asked me a couple of times if I was SURE I didn’t want to sew a back onto the quilt, because the seams hanging out looked all funny. Yes, mom, I’m sure.
Get out your spring action scissors (technically not a necessity, but again, makes this go SO much faster and they’re only like $6, so they’re HIGHLY recommended) and cut the seams close to your stitching every quarter inch or so. Then take your blanket to a laundromat (to save wear and tear on your washer, since what you’re doing is fraying the flannel edges and you won’t believe the amount of strings and lint your blanket will make) and wash it and dry it. You’ll end up with a blanket that looks somewhat like this:
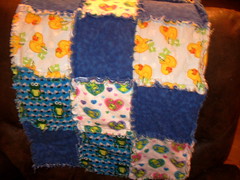 Beautimous.
The cool thing about these is, the more you wash them, the softer and more frayed and fabulous it will become. And it’s easy peasy enough for a beginner seamstress, but also fast enough to be able to bang a few of them out in time for Christmas. AND, it looks good enough for people to be impressed at what you made them.
Enjoy sewing these!

Ooooh, I think even I could do this, and I think I’m quite a beginner! Thanks for the idea!
Thanks for the easy instructions for making a rag quilt. Yours are the best of all the sites I checked. I will be starting my blanket asap.
I have done several “pseudo-quilts” by starting with a cheap acrylic blanket in the size of the bed I want to cover. Color is irrelevant, as is softness. The acrylic blanket is just there for warmth and to provide a structural base.
I used medium weight, high thread count cotton to create the cover. Now I have a modern home, and patchwork quilts are just too “country,” so I pieced mine in much larger pieces. Below are a couple of examples.
In one case, a queen-size black oriental themed quilt, I used a solid piece of black with gold dragons across the entire width of the top and the bottom. I believe I just bought a piece as long as the blanket was wide, and then cut it in half lengthwise to make the top and bottoms bands. The middle of the quilt was a piece of black cotton with cinnabar and jade colored medallions printed on it. I sewed together two pieces to make the center. The back was a plain solid black cotton, again sewed just two pieces together. I made sure the covers were at least 2″ wider (1″ on each edge) and longer than the blanket to be covered. After sewing the covers, I used the floor to made a sandwich of the back cover (raw seam facing up), acrylic blanket, and top cover (good side facing up). I aligned and smoothed it out carefully. Then I took a big jar of pins and pinned it everywhere I wanted to “quilt” the pieces together – the medallion design in the center provided a good dispersion of locations, so I just followed that. The top and bottom pieces weren’t big enough to worry about shifting, so I didn’t quilt them. Then I got a bag of jade-looking glass beads (the largest size of “seed” bead) , a bag of gold flat washer-shaped beads (all metal – you do NOT want to use plastic for this), and a couple of skeins of cinnabar colored cotton embroidery floss. Over several days, I replaced each pin with a tack using the embroidery floss and two beads. Starting from the back, I pushed the needle up through the whole quilt at the center of each “medallion,” leaving about 2 inches of floss hanging loose on the back side. I put my beads on, washer first, then bead, then passed the needle back through the washer and quilt while holding the loose end of floss with my other hand. I made sure to put about 1/16″ between the entry and exit points on the back side, so there would be some fabric there to anchor the tack. Once the floss was tight, I tied a simple double knot and trimmed the floss off to about an inch, forming a little tassel. Once all the tack-quilting was done, I decided I didn’t like the plainness of the join between the top and bottom panels and the main body of the cover, so I bought some gold upholstery braid (be sure to get one that washes well), and covered those seams with the braid, hand applied. To finish, I used black satin blanket binding on all edges. The result has lasted ten years and probably twice as many washings, and still looks great.
Another project was a twin-size lighthouse quilt for a boy’s room using four printed cotton panels intended for use as wall hangings, pieced with black cotton, buttons for the tack points, “rope” looking trim, a solid red cotton back, and red wide bias tape to finish the edges. You could do the same with pillow panels.
These take about two weeks to complete if you work on them about an hour a day, and cost less than $30 for materials if you shop carefully. The lighthouse quilt cost about $9 because I got all of the components on clearance.
Happy quilting!
I really love these quilts–I’ve make a couple for baby gifts. They really are super simple. It’s the cutting that takes all the time, so the spring-action scissors are a must!
This is perfect for what I want to make for my sister. Can you tell me how many 5″ squares i would need to make a queen size quilt?
Thanks,
Ann
I am pretty new at quilting and this project souds wonderful. I think I’ll have to try this one.
I totally love this, thanks for sharing. Your quiltsare so pretty ! I think i'm gonna like quilting !
Love it! Been checking out different sites for different styles of rag quilts. I've done only quilting quilts but I'm dying to do something quick and simple.
since I am teaching myself to sew and first time using a sewing machine I wanted to recycle some of my son's blankets that are too small now…the first one I did turned out awesome even tho its not ragged…(it wouldve looked really cute as a rag quilt too) but I didnt know of this till I was done…..so I am trying it again tho a little differently I have 3 different colors but putting them all on one square each (got that from another site)….this is by far the easiest way to make a blanket…the cutting and pining is the longest part, but sometimes you can find bundles of already cut fabric on ebay!! Its taking me a little longer to sew as I am still learning and my thread keeps breaking….but will be making many more blankets for sure!! I agree they make great gifts for people…
Has anyone put quilt batting between two layers of material for a thicker blankets? Did it turn out ok?