
Without any more procrastination or delay here is the Home-Ec101.com Knife Sharpening Tutorial. I talk about knife skills and the importance and safety of having sharp knives, but how do you get and keep your knives sharp?
First, let’s start off with a little anatomy of a knife.

This is my favorite knife, it’s a 6″ chef knife, it’s not very expensive, I just like the feel of it, which is the second most important aspect when buying a knife? Why? Because if you don’t like the way a knife feels you won’t use it.
What’s the most important feature when choosing a knife? The tang of the blade should run through the handle. Do not buy a knife without a full tang.

The third most important factor when choosing the knife is the type of metal. Look for stainless steel or high-carbon stainless steel. Avoid carbon steel, yes they can be honed to an edge easily, but they lose that edge easily AND can discolor some foods and may impart a metallic taste. Got it?
Finally, don’t waste your time with serrated chef knives. They usually aren’t sharp to start with and shred or mash some foods rather than cutting, once they lose what little edge they had.
So, now you have a knife, how do you sharpen it?
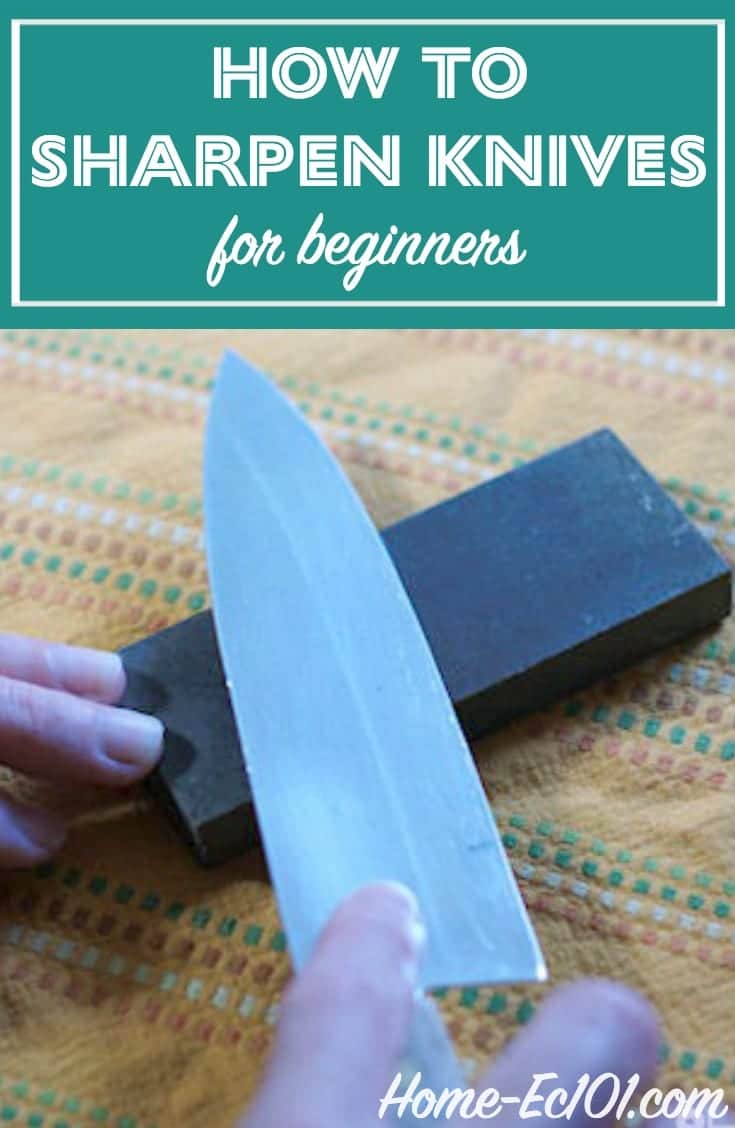
Knife Sharpening Tutorial
Remember you knife sharpening pros, this tutorial is for the beginner, with beginner equipment. If they want to get fancy there will eventually be Home-Ec101 Extra Credit or 201.
Get yourself a sharpening stone and a ceramic rod which can be found at box stores like the great, dreaded (heh) Walmart or cooking specialty stores. You don’t have to get fancy or spend a lot of money. You’ll also need a steel.
How to use a sharpening stone
Lubricate the stone with water, dish soap, or food grade oil. Just make sure to wash the stone thoroughly if you use vegetable oil to prevent it from going rancid.
The most important aspect of sharpening a knife is ensuring that the angle at which the knife comes in contact with the sharpening stone or ceramic rod stays consistent. This means if there is a 20-degree angle, it stays a 20-degree angle the length of the blade.

You can move the blade in a circular pattern from the tip the handle or it can be drug straight from the tip to the handle. The blade must stay at the same angle to the stone.

What ever you do to one side it must be repeated on the other side or the edge won’t be sharp. The angle of honing should be the same for both sides of the knife.

Keep the blade between a 15 and 30-degree angle. Remember the angle is less important the consistent application of said angle. It’s better to have a consistent 30-degree angle than an inconsistent 15 – 25. Got it?
How to use a ceramic rod for knife sharpening
After using the stone evenly on both sides, it is time to look carefully at the edge, lengthwise. Look on each side for dips, chips, and flat spots. If there are still imperfections work the knife on the stone a little longer. If you don’t see any and the angle of the edge looks consistent, it is time to step up to the ceramic rod.This is a lot like doing wood work and stepping to higher grade sandpaper for finer details.
There are a couple of options for holding the ceramic rod, it can be held firmly on a surface.

Or the ceramic rod can be held like a steel.

Remember to keep the angle to the rod consistent on both sides of the blade.
This step removes the scratches that may have been introduced by the stone. Check the blade. Does it look even, free of scratches? Great!
How to use a sharpening steel
The last step is to use the steel. This steel rod is included with many knife blocks or can be purchased separately. It does not remove metal like the previous two steps, it simply reshapes the edge, removing the burr from the edge of the blade.
The burr is a tiny, thin curve to the edge of the blade. This curve presents a dull edge to the cutting surface and needs to be removed.
Hold the knife in your dominant hand and the steel in your off-hand. Run the edge of the knife at the same angle as the previous two steps along the steel. Always move from the heel of the blade to the tip or in the reverse direction in one smooth motion. Don’t stop and start. Finally, always work both sides of the blade evenly.

This step should also be done between knife sharpening sessions to restore the edge of your knife after use.

*Edit* Don’t forget to wash the knife after sharpening to remove any metal bits. -Thanks @imabug for the reminder. I do that; I just forgot to note it.
Questions?
Send your domestic queries to helpme@home-ec101.com.
Learn more:

I was wondering when you were going to get to this 🙂
a lot of sharpening stones are double sided with a coarse and smooth side, in case the ceramic rod is hard to find.
don't forget to wipe/wash off the blade (carefully) after sharpening or honing to get rid of any fine metal particles left behind.
i find maintaining a consistent angle is easiest using two hands to hold the knife (obviously Heather is only using one hand because she hasn't trained her minions to take pictures for her yet).
a sharp knife is a safe knife
thank you thank you thank you i needed this! 😉
THANK YOU for this post! My favourite chef's knife and paring knife are both getting quite dull and annoying me to pieces. I knew there was a proper way to sharpen a knife, I just didn't know what it was. I will be getting a sharpening stone etc. ASAP.
One quick question. You mention holding the steel in your non-dominant hand and your knife in your dominant hand. Is this because of the pressure needed or because of how it gets shaped? I ask because I am left handed, but I cut using my right hand to hold the knife. So if it's my dominant hand for most tasks, it would be my left, but if it's my dominant chopping hand, it would be my right… Just don't want to wreck my knives!
Purely coordination and comfort. You're just trying to go for the most consistent angle possible. The only way you will wreck your knives are if you abuse the sharpening stone. Just use it until the nicks and chips are gone.
What about knife sharpening tools? You know, the ones that already have an angle and are supposed to make life easier :). Do they work? Don't work? Work, but not as well/last as long as this method? Thanks!
Typically they are carbide wheels and tear up a blade. They sharpen it, but not that well and can reduce the lifespan of the knife.
People may also need to check with the manufacturer. I have a set of Cutco knives (won on a game show, years ago!) and discovered that Cutco offers free sharpening for the life of the product. You have to ship it to them and pay a small shipping-and-handling fee, but they do a wonderful job sharpening and will even sharpen serrated knives that you can't do yourself.
Maintaining the blade is important, but so is maintaining the handle. A knife with a great blade but a broken handle is pretty close to useless. Ever tried cutting something with a knife and had the handle come apart in your hands? That's dangerous! So here's how to extend the life of your knives by maintaining the handles.
First, look at the handles on your knives. Are they wood or plastic? I've found that plastic handled knives can tolerate the occasional trip through the dishwasher, but wooden ones are sometimes ruined very quickly by exposure to water, including soaking in the sink. In general, I avoid putting knives in the dishwasher and hand wash them instead.
To keep wooden or horn handles looking decent, they must be hand washed and dried right away. They also should be oiled regularly. I use plain olive oil when the handles start to look dry…wipe on, let sit for about 20 minutes, wipe off, and put away. Horn handles should be treated with oil suitable for use on leather – mink oil or neat's foot oil using the same method, but pay extra attention to getting the oil down into the crevices of the horn because that's where the cracks start. Antique knives also may be prone to rust – the blades of these should be oiled (olive oil is fine) every time before putting away.
Over time, plastic handles will begin to get dull and whitish in appearance – this is due to oxidation. I found that a good rubbing with polishing compound (Simichrome, Jeweler's rouge, or even Brasso in a pinch) removes the white and restores a good finish. Wash well to remove the polishing compound and oil using the method above. Plastic handled knives can be maintained in like-new condition for many years if you will treat them this way about twice a year (more often if you put them in the dishwasher).
Now…if you are like most people I know, you already have wooden handled knives that have been soaked and are grayed or delaminating. All is not lost…treat with tung oil – the kind that sets hard to a glossy finish – and coat the handles of half of your knives thoroughly. Check them regularly and recoat as they absorb the oil. Do this several times or until no more oil is absorbed, then wipe dry and leave out where they can air dry. It is best to do all of this outside of the main area of the house because it can be quite smelly. This will extend the useful life of the knife handles, but cannot make them like new again.
You give great advice.
The handles on my knives are just about shot, but I've had them for *egads* 10 years and I didn't take care of them at all.
My next set I'll take better care of.
I know someone who has rehandled his knives, so it can be done. I have no idea how he did it, but, thought I'd mention it. Someone who has ruined their handles but has a woodworking handy diy sort of friend, it might be worth letting them have a go before you spend money on new knives.
You can make a handle for almost nothing all you need is a sander a block of wood an some epoxy. Example take a 2×4. cut it in half vertically spread your epoxy on the handle and on the wood. use a padded clamp to clamp the new handle on an check in a hour or so. Then sand it down to fit your hand
I'm so glad you came out with this. Like others I've often wondered how to sharpen my knives. Now, I will have the sharpest knives in town. I've learned alot from your blog, and I just love it.
Thank you, this helps so much! I have been looking for a visual and detailed tutorial.
thank you for the article this is something i've always wondered about!
Thanks for the article. Very interesting.
Is bread / serrated knives sharpened in a similar way? I assuming this would take much longer, is there a smaller rod that is needed?